Loadout Recommendations
Weapons: The boss fight is done mainly with Ol’ Tessie, so ultimately use whatever you are comfortable with.
- An AR or any weapon that can equip the smoke launcher
Equipment: While you can find them around the map, spawning in with the following can make things easier
- Stun Grenade
- Throwing Axe
- Molotov: only if there is more than one player
- Toxic Growth: If you plan on doing the pods easer egg, then start with this
- Frenzied Guard: Can be useful for certain lockdown steps
- Aether Shroud: Is useful throughout the egg and is a must use for the boss
- Juggernog: Probiotic lets you take more hits while in the boss fight since you will be in Ol’ Tessie
Upgrading Ol' Tessie and Pack-a-Punch
TIP: When first spawning in, you can do the green pods easter egg to gain some early loot while you’re building points. Just don’t forget to switch your field upgrade after you are done to one of the other recommended ones.
When you first spawn in, you’ll probably want to build up some points before leaving the spawn. If you’re playing in standard mode, the most point effective way is to melee the zombies in the head. In order to do this successfully you need to aim directly at the head of the zombie. When your melee stops being a one hit, you can hit the alt fire button to perform a heavy attack that is slower but will be a one hit for longer.
Once you have a couple thousand points built up, head over to the building on the other side of spawn to the left. Inside you will find a grate and once meleed, TEDD’s head which you need to pick up. There is also a stun grenade on the table behind which you’ll want to pick up. Head out the door and there will be a truck. Go up to the truck and interact with it to build on the head you picked up. This will make the truck, Ol’ Tessie, drivable and this truck is a crucial part of opening the map and the easter egg.
Hop inside Tessie and drive left until you smash through a wooden gate. At this point you will be in one of the fog areas and special zombies will attack you. These zombies will continually respawn and do not count towards the round count. There will also be red growths that will blow up if you get too close and green growths that will heal Tessie when driven over.
Keep driving until you reach the next point of interest which is Blackwater Lake. To the right you will see a generator covered in orange spots. Shoot all the spots including the giant one on top at the end in a certain amount of time to turn on the generator. If failed, you will need to flip the round to get the spots to appear again.
Next head up into the second floor of the cabin and hit the power switch to turn on power at the location.
TIP: If you don’t have a combat axe, start the axe throwing easter egg to obtain one. It will be needed for a later serum part. Feel free to finish the egg to get some extra loot.
You should also grab the jar needed for the Widow’s Lantern serum part.
Installing Pack-a-Punch
Hop back into Tessie and continue driving until you reach the next POI, Ashwood. Hop out of Tessie and use on of the zip lines on either side of the ravine to ascend into the town. From here make your way to the bridge, turn on the generator just like before, and then flip the power switch.
Once the power is on, make your way back down to Tessie and drive her into the garage. The door will open when you get close. Once inside the garage, hop out and interact with the crafting table to the right to install the Pack-a-Punch onto Tessie. You will now be able to pack by interacting with the back of Tessie, as well as use a speed boost while driving.
From here you should drive back in the direction you came but take the path to the right of the church. This will lead you to the Vandorn Farm area where you will need to turn on another generator and flip the power switch.
TIP: You should place down the jar needed for the Widow’s Lantern serum part if picked up previously. You can also start doing other tasks to collect more parts to make the serum.
Obtaining the beam attack for Tessie
Once you have the pack installed on Tessie, drive to the opposite end of the ravine and take the path on the right, which will lead you to the diner location. Head inside the diner and you’ll find a kitchen area. You will need to get kills in this area after round 5 until a zombie called cook drops a freezer key. Once acquired, use the key on the freezer and pick up the Abomination carcass inside.
Head back to the garage in Ashwood and use the same workbench as before to add it onto Tessie to give you a beam attack.
Building the Necrofluid Gauntlet
TIP: The map’s Wonder Weapon, the Necrofluid Gauntlet, is required to beat the Easter Egg. If you get it from the box however, you can completely skip building it.
Saving Klaus
After round 8, head to the Janus Tower spawn area and go near this wrecked container, out of which an Uber Klaus will spawn. To defeat it efficiently, aim for the glowing discs on its shoulders and then for the main body once those are destroyed. After defeating the giant suit, a smaller robot will emerge and start flying around and attacking you. Defeat this and it will drop a part that you need to pick up.
Head back to Ashwood and head up the zipline opposite the garage, then make your way into the back left corner near Vulture Aid. There you will find the sheriff’s office and inside a restrained Klaus. Interact with the panel on the jail door and after a while it will say that the system needs a reboot. At this point, throw two stun grenades (which you should already have if following this guide) into the cell, which will stun Klaus and cause him to break free and fly through the roof.
He will now take over your tactical equipment slot for a limited time and using it will cause him to move to wherever you are looking when used. He will also be available to be called in throughout your game using radios around the map.
TIP: Sometimes the stun grenades can bounce out of the cell and cause them not to hit Klaus. If you’re having trouble, move to the side of the cell and throw the stuns directly behind the chair.
Filling the Aether Canister
After freeing Klaus, he will automatically become available for you to use. Hop in Tessie and head to the cosmodrome area and make your way underground using the staircase on the other side from the rocket.
Here you will find a panel, and you will need to call Klaus in directly in front of the panel. Once he arrives, he will smash it at which point you can interact with it. Doing so will cause a scan to initiate and a red circle to appear on the ground. Whoever interacted with the panel will need to stand in this circle until it is finished. If any other player or zombie enters the circle, the scan will stop.
Once complete, you can grab the Aether canister right in front of you. While you are holding the canister, you can only sprint however you can drop the canister if needed. Hop into Tessie with the canister and make your way to Ashwood.
TIP: It is highly advised to do this at the end of a round as there are several fail conditions for the scan:
1.The scan is time based and you will fail if the timer runs out.
2. Leaving the area or the circle for too long will immediately fail
When in Ashwood, make your way to the generator and interact with it to place in the Aether Canister. Extra zombies will spawn but they will not attack the canister. Once the canister is finished, it will emit a blast of energy after which you have a limited amount of time to interact with the generator and take the canister to the next generator, which will be the one at the cabin area. Take it there and repeat the same step. After grabbing the canister, make your way to the farm and do the same thing with the generator there. Once finished, head towards the barn and turn right immediately after entering the door. This will lead you into a basement area and a strange box on a pedestal. Interact with this box to empty the Aether canister into it.
Unlocking the box and gaining the Gauntlet
Go back outside and to the green launchpad near the entrance to the farm. Use the panel on the right side to fling yourself to Janus Towers. Once airborne, look on the roofs of the farm area for three red symbols which you’ll need to memorize. Don’t worry if you missed them the first time as you’ll want to use the launch pad at Janus Towers to travel back to the farm. After obtaining the symbols, go back down to the box and interact with one of its three sides that have a green circle. This will reveal a symbol, and you will need to keep interacting with that side until the symbol matches one of the ones on the roofs. Once you have a match, move onto the next side and repeat until all three sides are done.
TIP: This next part is best done at the end of a round.
You can now retrieve the wonder weapon from the fourth side of the box; however, you should be prepared before doing so as a lockdown will start. In this lockdown you will be stuck inside a green circle and need to pop six bubbles that will appear randomly around the room. In order to pop these bubbles, you need to know how to use the gauntlet.
When fired, the gauntlet will fire out a spike. Reloading the weapon will cause all the spikes to return to the gauntlet and refund the ammo retrieved. Both firing and retrieving the spikes can damage zombies. The gauntlet also has a powerful melee attack. Once packed, you can use the alternate fire to explode the spikes instead of retrieving them.
In order to pop the bubbles, you need to fire a spike at them and whenever you reload to retrieve the spikes, the bubbles will pop. Zombies will attack you during this time, so prioritize survival and only pop bubble when you have an opportunity. After all six bubbles are popped, the lockdown will end, and you will have the Necrofluid Gauntlet.
Making the Serum
Hoard Husk Chunks
When driving in the fog areas, you should be on the lookout for glowing purple pods on the side of the road. After you have installed the abomination carcass on Tessie, drive to one of the pods and use your beam attack. This will break the pod which will drop loot plus the hoard husk chunks part on your first one.
TIP: When shooting the purple pod with Tessie, don’t pull right up to it as the items can fly out and underneath the truck, making retrieving the item difficult without a down due to the fog zombies. Instead, just shoot the pods from range.
Ravager Eyes
To obtain the Ravager Eyes, you will need to kill a ravager with the sawblade trap at the farm or diner. The easiest time to do this is on a ravager round, but any ravager will work. The first ravager round will be on round 5 or 6, so you can easily do this at the farm or diner locations while getting setup.
Human bones
While you’re inside the barn, look for a hanging body in the middle of the room. Throw an axe at its right foot and it should fall off onto the ground below. Next, you’ll need to throw a molotov on the foot to turn it into the human bones to be picked up.
TIP: You can craft a molotov at the workbench in the farm or look to the left front corner of the garage for a free one.
Widow's Lantern (Mushroom)
In the cabin at the Blackwater Lake location, you should find a kitchen area. Across from the stove there is a jar on a shelf that you need to pick up.
Head to the farm location and interact with the dead horse in the road to use the jar. Wait 2 rounds and you can come back to pick up the Widow’s Lantern.
Chalk of the forgotten
This part can only be after getting the Necrofluid Gauntlet and Wisp Tea.
To get this piece, you need to get Wisp Tea to activate and run to the mirror in the room opposite the jail cell Klaus was freed from. The wisp should go into the mirror and reveal an image. Shoot the mirror with the gauntlet and the part should pop out within a few seconds.
TIP: Wisp Tea will randomly proc at certain intervals after dealing damage but immediately when you first get it and deal damage, so it is ideal to head to the mirror right after getting the perk. Whether you buy the perk at the cosmodrome, complete the free Wisp Tea easter egg, or get it from a TEDD trial or pod, you will immediately want to use the launch pads to go to Ashwood and straight to the mirror. Otherwise, you will need to wait until it randomly procs again.
Mysterious Limb
All that is needed to get this part is to kill a Zursa (the bear elite enemy) with the beam attack on Tessie. You only need to deal the killing blow with the beam, so you will want to get the Zursa low on health beforehand as it would take several beam attacks to defeat it otherwise.
TIP: A Zursa will not spawn naturally in your game until round 16, however you can use the skulls easter egg to spawn one in at any round.
However, you may find that the mysterious limb is not one of the ingredients needed in your serum. You can do the next step outlined below to see if the mysterious limb, which looks like a tentacle, is even needed in your game.
Craft the Serum
Once you have all the necessary pieces, head to the cosmodrome and into the room next to the exfil booth. On the left side you will find a table with a beaker and all of the serum pieces you have collected. Interact with the fifth bowl from the left that looks like chalk dust, and a pigpen cipher will appear on the chalkboard behind the beaker. You will need to use the chart below to match the first symbol of each word to the corresponding serum part and then interact with the parts in top to bottom order according to the chalkboard.
If done correctly, you will then be given a prompt to interact with the beaker. If done incorrectly, your character will give a quote indicating such and you will need to flip the round to try again.
When ready, interact with the beaker and you will begin a lockdown inside the room that will set your heath to a very low amount with no regen. You need to survive until the room fills up with purple smoke and you will be released to move onto the next step.
TIP: The lockdown can be very difficult, especially on solo. If you stand in the corner to the left of the beaker table, the zombies will only spawn in your field of view. Some helpful items to have are point turrets, defensive field upgrades like Aether Shroud or Frenzied guard, tacticals like monkeys, Kazimirs, or decoys, and upgraded weapons, especially the gauntlet. Score streaks will become unavailable while in the lockdown.
Obtaining the Keys
You will now be able to gather three keys. Each key is located in one of the fog areas and has three possible spawn locations. These keys cannot be transported via jump pad, so it is advised to have Tessie nearby when collecting.
When collecting these keys, you need to use the Gauntlet to shoot a spike (or multiple to be safe) near the key and then use the reload button to recall the spike. If the spike is close to the key, it will be sucked in as well and drop on the ground to be picked up.
After retrieving a key, take it to a relic located in Ashwood near the crafting table behind Juggernog. Interact with the relic to use the key. Repeat for all three keys.
TIP: You will be attacked by the fog zombies while collecting these keys. Do not be afraid to use your equipment or field upgrades to avoid a down.
Yellow (Bruin) Key
This key is located between the Zarya Cosmodrome and Ashwood. When picked up, you will be forced to use only your melee weapon.
Green (Terrapin) Key
This key is located between the Vandorn Farm and Ashwood. When picked up you will become very slow, so having Tessie nearby is mandatory.
Red (Nightbird) Key
This key is located between Exit 115 (Diner) and Ashwood. When picked up, your health will not regenerate.
Once all three keys have been used on the relic, a cutscene will play. After exiting the cutscene, a DG-2 turret will spawn in the relic’s place. Pick it up and head down to the garage to install it on Tessie.
Complete the Four Trials
TIP: It’s best to have Tessie facing away from the gate to avoid accidentally backing into the last zombie of a round while driving to the diner trial. Driving forward makes it easier to avoid.
After installing the turret, drive Tessie out of the garage to the right and stop just before the farthest gate into the fog towards the farm. Use the turret to shoot the floating purple tower behind you. If done correctly you should hear a bell toll. This will make the clocks on all the faces stop moving. Shoot a shot of the Necrofluid Gauntlet at one of the clocks and then hit the reload button. If done correctly, you will become purple and this will allow you to interact with certain objects around the map to complete trials.
There are some important things to note about how this mechanic works
- You can become purple three times per round, but you will need to shoot a different clock face each time
- The clock face pointing towards the relic location during the key step will not turn you purple
- Once you are purple, you have 90 seconds before the effect wears off
- The tower will need to be reshot with the turret every single round in order for you to be able to turn purple
- If you fire the Gauntlet you will lose the purple effect
TIP: The diner, farm, and cosmodrome trials can be done in any order or even at the same time. The Blackwater Lake trial can only be done once the other three are completed.
Exit 115 (Diner) Trial
TIP: It is advised to prioritize the diner trial if it is a lightning round. You can always pick back up the other trials where you left off.
If the current round isn’t a lightning round, you can do an easter egg to make it one.
This step can only be done during a “lightning round”. After obtaining the DG-2 turret, lightning will begin striking the diner area every other round. This effect can be seen very easily from Ashwood and there will be a thunder sound effect as well.
Turn purple and drive Tessie to the diner location. Park right in front of the back of the semi-truck trailer.
From here you will be responsible for reviving and guiding three special zombies to certain locations. In order to do this, you will need to shoot the clock on top of the service station with the Necrofluid Gauntlet. Once shot, you will only have 60 seconds until the lightning disappears. Do not worry if you cannot get all three zombies to their locations in the allotted time. Once a zombie is in its correct spot, its progress will save on the next lightning round, so there is no need to do a zombie again once already done. Additionally, once you revive a zombie, there is no need to revive it again. Just go stand near the body and the zombie will follow you once more.
Mechanic
Shoot the clock while purple and head into the car repair shop. Look to the back left of the room for the radio to call Klaus and use it. When Klaus is available call him on top of the zombie laying under the car. Stand near the zombie and it should turn glowing yellow and start chasing you. Lead it up to the top of the car shop and into the yellow lightning.
TIP: Since it can take a while to call Klaus in, you may want to start reviving one of the other zombies while you wait for Klaus to become available.
Trucker
Hop in Tessie and drive her into the back of the red semi. This should revive the zombie to the left and he will start to glow red. Guide the zombie on top of the service station and into the red lightning.
Waitress
TIP: Contrary to what many other guides say, you do NOT need Melee Macchiato for this step. Meleeing the register several times while holding a normal gun will work.
Head into the diner and behind the counter. Melee the register and the zombie on the floor should revive. Guide the zombie on top of the diner station and into the blue lightning. The best way to get on top of the diner is to run out the back door by the freezers, head right around the diner, and wall jump on top of the semi.
Zarya Cosmodrome Trial
This trial will require two purple shots to complete but they do not have to be done in the same round. You will need to turn purple and shoot the two spinning radar dishes at the cosmodrome. You do not need Tessie for this step, so it is easier to use the jump pad in Ashwood to travel to the cosmodrome once purple and then use the jump pad in the cosmodrome to return to Ashwood after shooting one dish. If shot correctly, the radar dish will slow down and have a purple glow at the base.
Head into the lab to the right of the cosmodrome jump pad and you will see two monitors each displaying pigpen cipher symbols. These symbols correspond to adjacent letters in a larger word. Look through the words in chart below to find the symbols displayed on your monitors. Your word will correspond to a number sequence also indicated by the chart. Input the number sequence into the six other monitors in the room that are flashing different numbers. In order to input a number, shoot the red button in the bottom right of the monitor when the correct number is displayed. If you input an incorrect number, shoot the rest of the monitor’s red buttons to fail the sequence. You will then need to flip the round and reshoot the two radar dishes while purple to get a new code and number sequence to input.
Vandorn Farm Trial
Turn purple and head to the farm location. Tessie is not needed for this trial, so feel free to use the jump pad. Once at the farm, head into the house and you will see a clock on the wall behind the family at the table to the left. This clock will display 12, 3, 6, or 9 o’clock and this corresponds to the family table with the zombie at the head of the table being 12 o’clock. Stand on the same side of the table as indicated by your clock and the zombie at the head of the table will turn to look at you if you are in the correct spot. If you are having trouble finding the exact spot to stand, there are roman numerals etched into the floor around the table to indicate where to stand. When the zombie’s eyes turn red and only after the eyes are red, shoot him with the purple shot and his head will fall backwards and glow blue.
There will now be four items around the farm that you need to pick up.
Once the items have been collected, they will need to be placed on symbols on the ground around the outside. Once placed, interact with one of the items and a timer and health bar will start. Getting this to start can be finnicky, so just keep interacting with an item until it starts. You will need to defend all four items from zombies. If the health bar hasn’t reached zero before the timer, you will get a sound cue and a quote from the entity. If the health bar reaches zero before the timer, one of the four items will turn red and you will need to interact with it and then kill zombies near it until it turns gold again, at which point you can restart the defense.
TIP: On solo this defense can be tricky as the items are far apart. If you are struggling, try using the sawblade trap, throwing monkey bombs or Kazimirs, using Frenzied Guard, using point turrets or a sentry gun to defend farther away items, or the alternate fire of the Necrofluid Gauntlet near the items. If using Frenzied Guard, switch to Aether Shroud for the boss fight.
DO NOT try this during a special Ravager round as they will tear through the item’s health.
Blackwater Lake Trial
This trial can only be done after the other three are complete.
Turn purple and head to blackwater lake. You can take the jump pad if desired since Tessie isn’t required for this trial, but if you plan on going straight into the boss fight you will want to bring her to the lake. Once there, interact with a wisp that is located on the dock behind the cabin. The wisp will disappear, and you will need to run into the house and find the projector on the bottom floor. Shoot it with a purple shot and it will display four pictures of four places at the lake. Take note of the location of the pictures and what order they appear. If you miss the order of the pictures, you will need to turn purple and shoot the projector again.
Once you have the locations and order of the pictures, you will need to shoot four film reals that correspond with each location in the same order as the corresponding locations. If shot correctly, each real will turn purple. If not, you will get a jumpscare and will need to flip the round before trying again.
If you shot all four film reals correctly you will get a quote from the entity. Head upstairs into the Speed Cola room and you’ll see a wisp that will disappear as you approach. Interact with the box the wisp was in, and your character will say something to indicate that they cannot pick something up. At this point you need to call Klaus to the location and when he arrives, he will pick up the object and go stand near the radio to call him in. He will remain there until you are ready for the boss fight.
If you save and quit any time from now before beating the egg, you will need to interact with the object and get Klaus to pick it up again.
Boss Fight
Preparation
This fight will mostly take place while using Tessie, so there aren’t that many things that are absolutely necessary to take, however you will absolutely want the following items:
- Perks: Obviously, the more perks the better, but only Juggernog and Quick Revive with Equivalent Exchange or Dying Wish are absolutely necessary. Any perks that increase damage like Double Tap and Deadshot are helpful, but you will only deal damage to the boss with your weapon for a few small windows.
- Equipment: Anything that occupies zombies is a must. Kazimirs and monkeys are great, but decoys can work
- Field Upgrade: Aether Shroud with extra charge and group shroud if playing in a party is strongly recommended
- Weapon: Any wonder weapon is just fine, along with any full auto weapon. You’ll want pack 3 if possible, but level 2 is just fine. If you have on Equivalent Exchange for Quick Revive, you’ll want either ray guns or a packed pistol.
Entering the boss fight
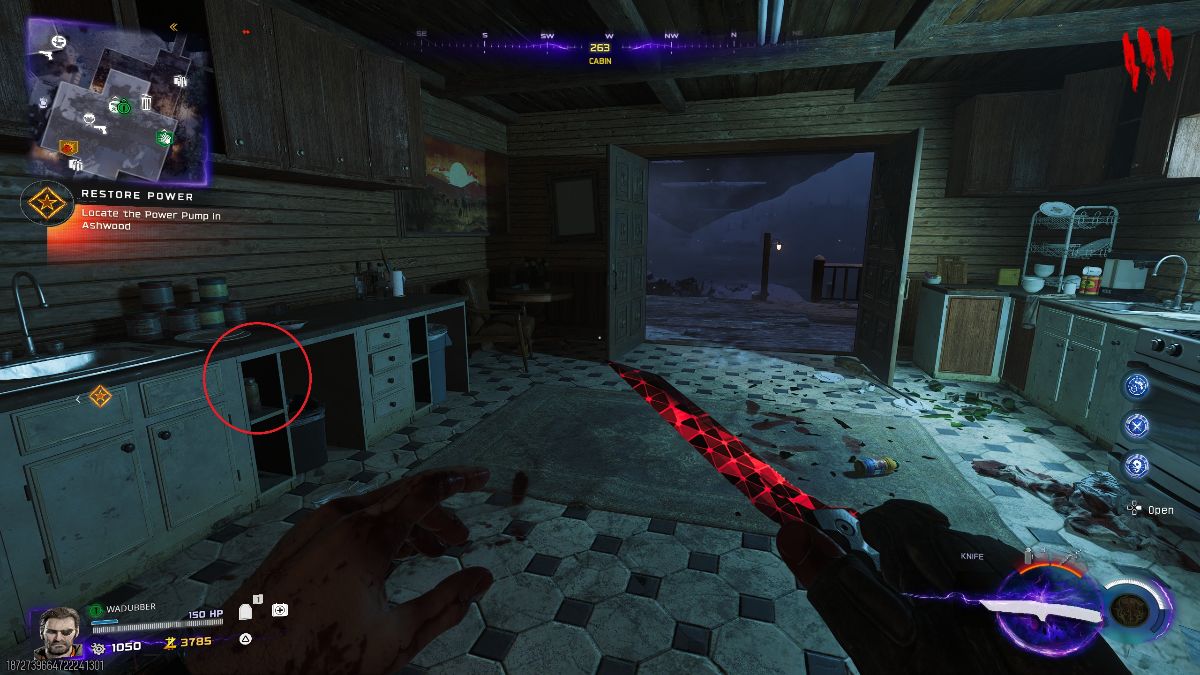
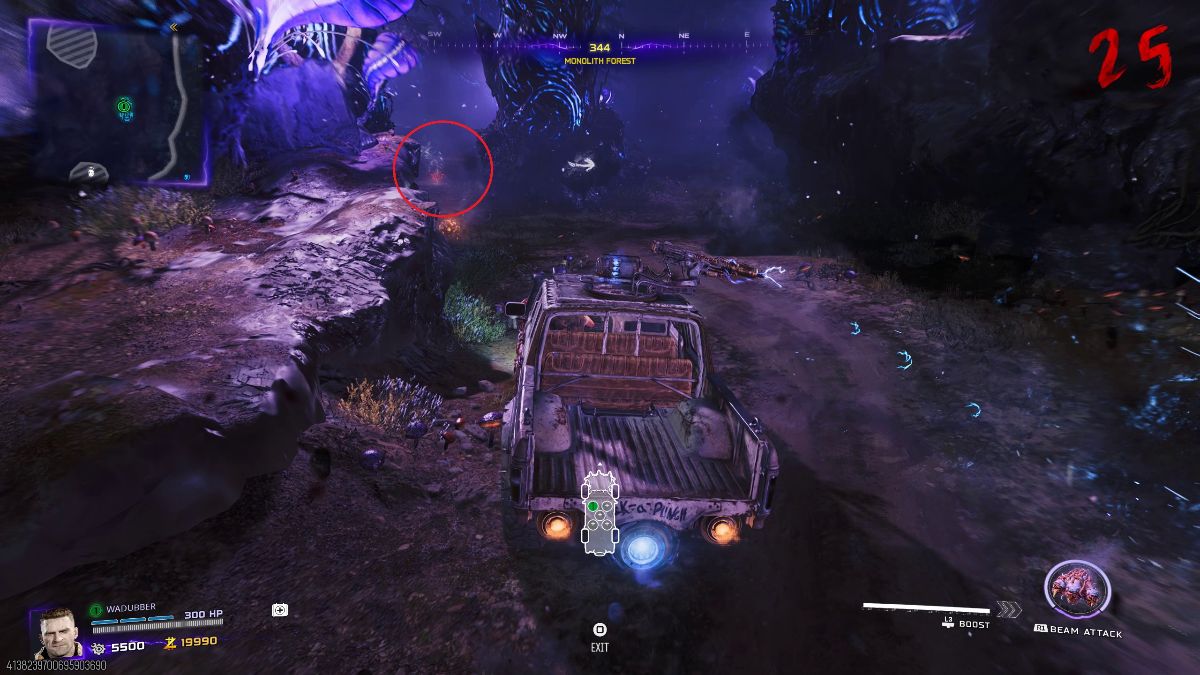
Before starting the encounter, you will want to bring Tessie to the lake and face her towards the gate to Janus Towers. When ready to start, interact with Klaus and hop in Tessie. Drive up towards the gate to Janus Towers and wait until the first wisp spawns.
As you are driving, you’ll need to run over wisps that will be in set locations along the fog paths in between pois. If you fail to collect a wisp before leaving the area, you will need to flip the round and interact with Klaus again.
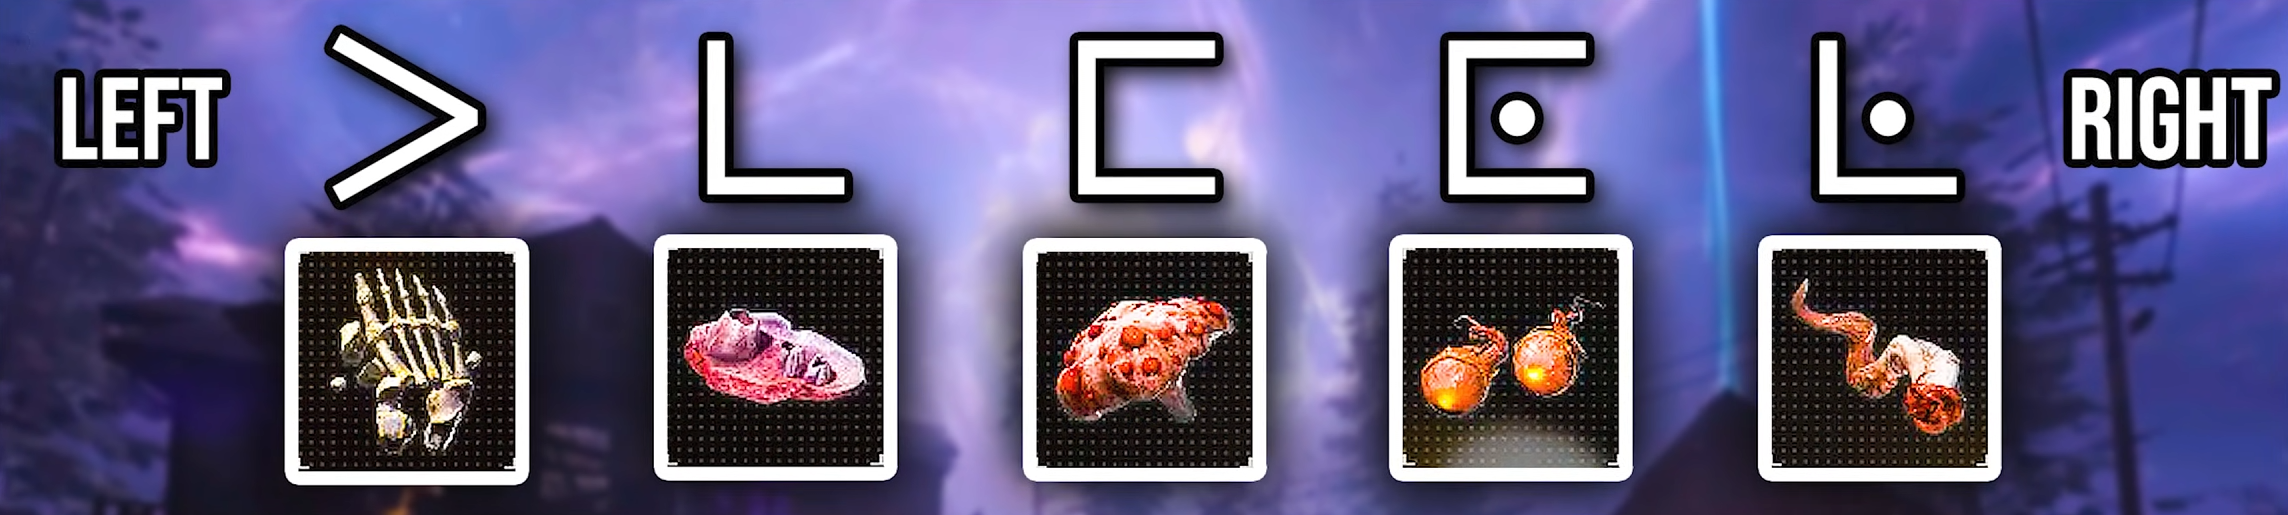
For the first path, you need to go right, left, and then right again to collect the wisps.
After heading through the spawn area, you’ll go into the second fog area. There are no different paths here, so just keep driving and collecting the wisps.
After leaving the farm area, you will be in the fog path with the boat. You need to drive up the ramp on the right side onto the boat and immediately turn right. Do not head straight after taking the ramp.
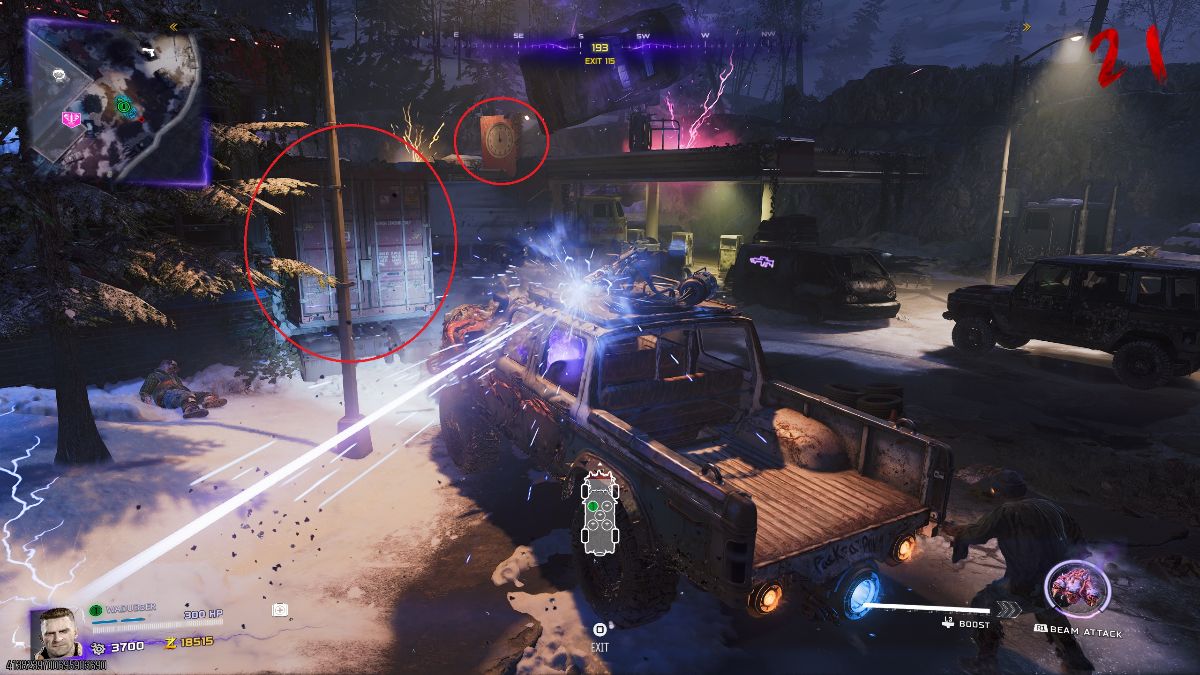
Upon reaching Ashwood, hug right to head back to Blackwater Lake and go to the left of the rock splitting the road to collect the second wisp. When the third wisp is collected, you will be teleported into the boss arena.
Defeating Veytharion
TIP: You DO NOT have to boost into the boss to deal damage. Driving up the ramp in the middle of the arena will give you enough momentum to hit the boss.
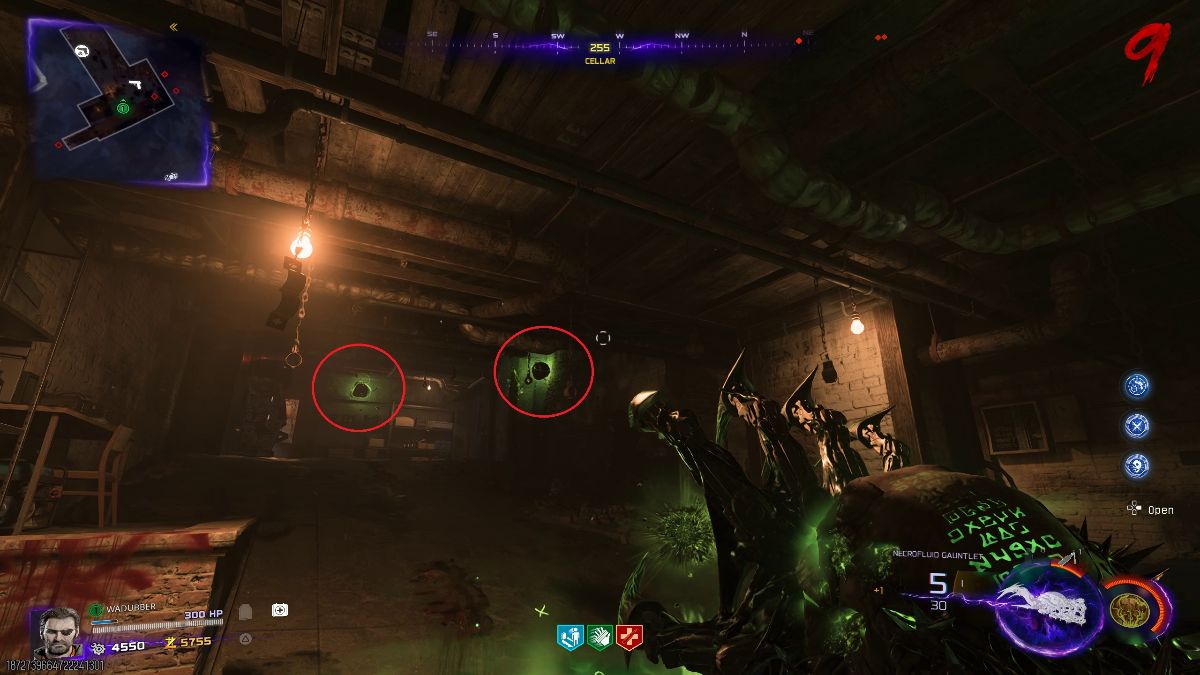
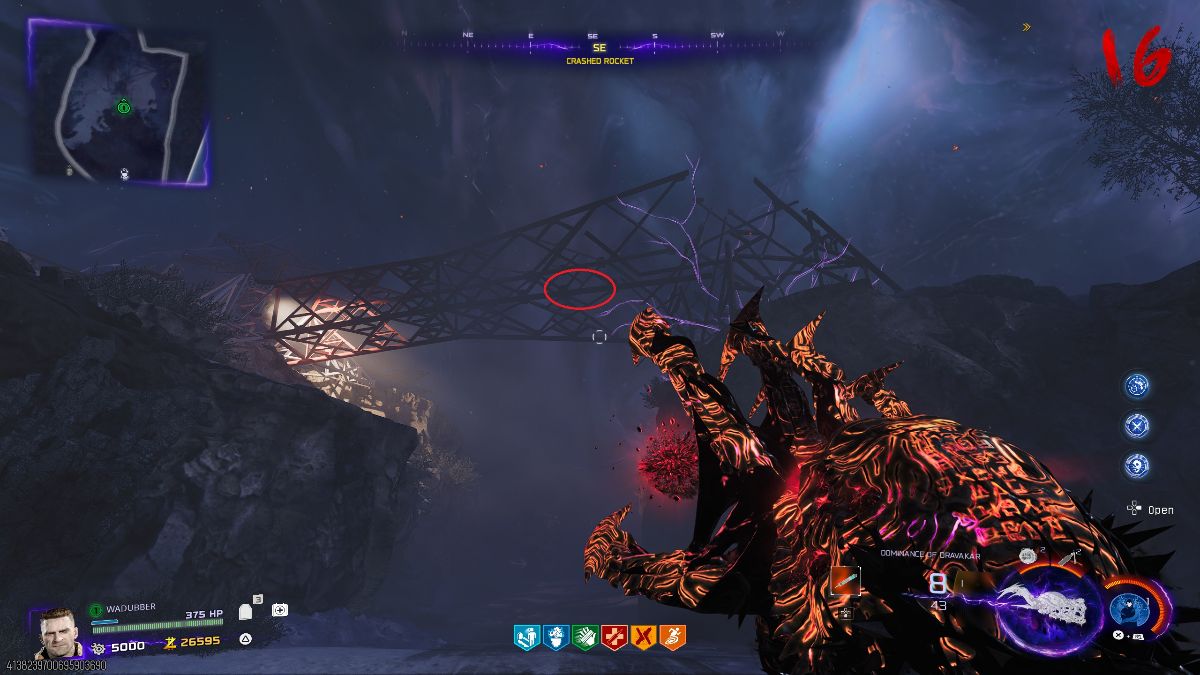
There are also some power drops on walls in the arena. You can only retrieve them using the Necrofluid Gauntlet’s retrieve function and you shouldn’t try and get these unless absolutely necessary.
After spawning into the arena, move forward a bit to get the boss to spawn and you will be teleported into Tessie.
From this point forward, you will want to be in Tessie almost the whole time with someone in the gunner seat. If you have more than two people, then they can run around the arena and shoot the boss if desired, but they will deal minimal damage.
In order to deal significant damage to the boss, you will need to ram it with Tessie. Occasionally throughout the fight, the boss will have a glowing red spot which will deal double damage if hit, however you should deal damage when you can and not wait just to hit the crit spot.
Throughout the fight, the boss will leave the center and shoot missiles around the arena, sometimes multiple volleys. These missiles will impact around 5 seconds upon being indicated on the ground. During this time, it is best to drive slowly and deliberately to evade the missiles as driving fast can cause you to lose control of Tessie. Save your boost until you absolutely need it to get out of danger.
Tessie will probably take some damage during the fight, however green pods will spawn and respawn around the arena, and you should use these to heal Tessie. If the truck does get destroyed, use Kazimirs, monkeys, or decoys to distract the zombies. Unless absolutely necessary, save your Aether Shroud until later in the fight. Do be mindful that the boss can shoot missles at you while out of the truck, so you’ll want to avoid those and then repair Tessie during an opening.
After dealing enough damage, the boss will become immune and start spinning around the arena. Dealing enough damage either with weapons or just ramming it with Tessie will cause it to shoot out a beam of light that will land somewhere in the arena. You have a few seconds to make your way to the light with Tessie and if succesful, Tessie will glow and the boss will move back into the center of the arena. Just hit it while Tessie is glowing in order to stun the boss and show a yellow weak point underneath. Either hop out and use a weapon or switch to the turret to hit this crit spot. If you do enough damage the boss will let out a scream, and you will move onto the next phase. Wonder weapons are the best way to deal damage during this stun period.
If you don’t manage to deal enough damage the first time before the boss becomes unstunned, just repeat the same steps above until you move onto the next phase. Be aware though that if the boss wakes up and you are not in Tessie, it will attempt to pick it up and throw it at you, which will immediately break Tessie. If the boss does pickup Tessie, try and run to a hiding spot or the edge of the arena.
Phase two is exactly the same as the first except that the boss will spawn Ravagers occasionally. There will also be a max armor and max ammo that spawn for a limited time on the outsides of the arena. Absolutely pick these up.
Other than that, repeat everything in phase one to move onto phase three.
Phase three will give the boss one more move that will change how you approach dealing damage. The boss will charge up a purple laser for around ten seconds. This laser when fully charged will tear through Tessie’s health and almost immediately kill you. In order to stop the laser from firing, you need to boost into the boss. You can deal damage still without boosting but only the boost will cancel the laser. The best strategy to beat this phase is to boost into the boss and then drive carefully around the arena until your boost is recharged and repeat. Do not panic and use your boost for anything other than hitting the boss as doing this will leave you unable to cancel the next laser.
If you fail to stop the laser in time, there are a few things you can do:
- If Tessie isn’t destroyed, you can drive behind one of the pillars to block the laser or try and boost past the boss to the other side of the arena to take minimal damage.
- If Tessie is destroyed, use your Aether Shroud to fix her as this will make the boss unable to see you. In the case that you don’t have an Aether Shroud, quickly run and put the truck between you and the boss or hide behind a pillar or ledge, as these will block the laser, and use your equipment to deal with the zombies while repairing Tessie.
- In coop, the boss can only shoot one person at a time, so the others are free to help repair Tessie or deal with the Zursa that spawns only in coop
Eventually you will move onto the last immune phase. Repeat it as always until the boss is defeated.
Congrats! You’ve completed the Ashes of the Damned Main Easter Egg. Enjoy the cutscene!
Youtube Guides
Easy to follow guide by Doughnuts
Optimized guide by Schrawgs